Introduction
Watering plants regularly is essential, but it is easy to forget – especially during busy schedules or travel. An automatic plant watering system using Arduino solves this problem by monitoring soil moisture levels and activating watering only when necessary.
This project uses:
- Arduino UNO
- Soil Moisture Sensor
- 1-Channel Relay Module
- 3V DC Water Pump
- 0.96” I2C OLED Display
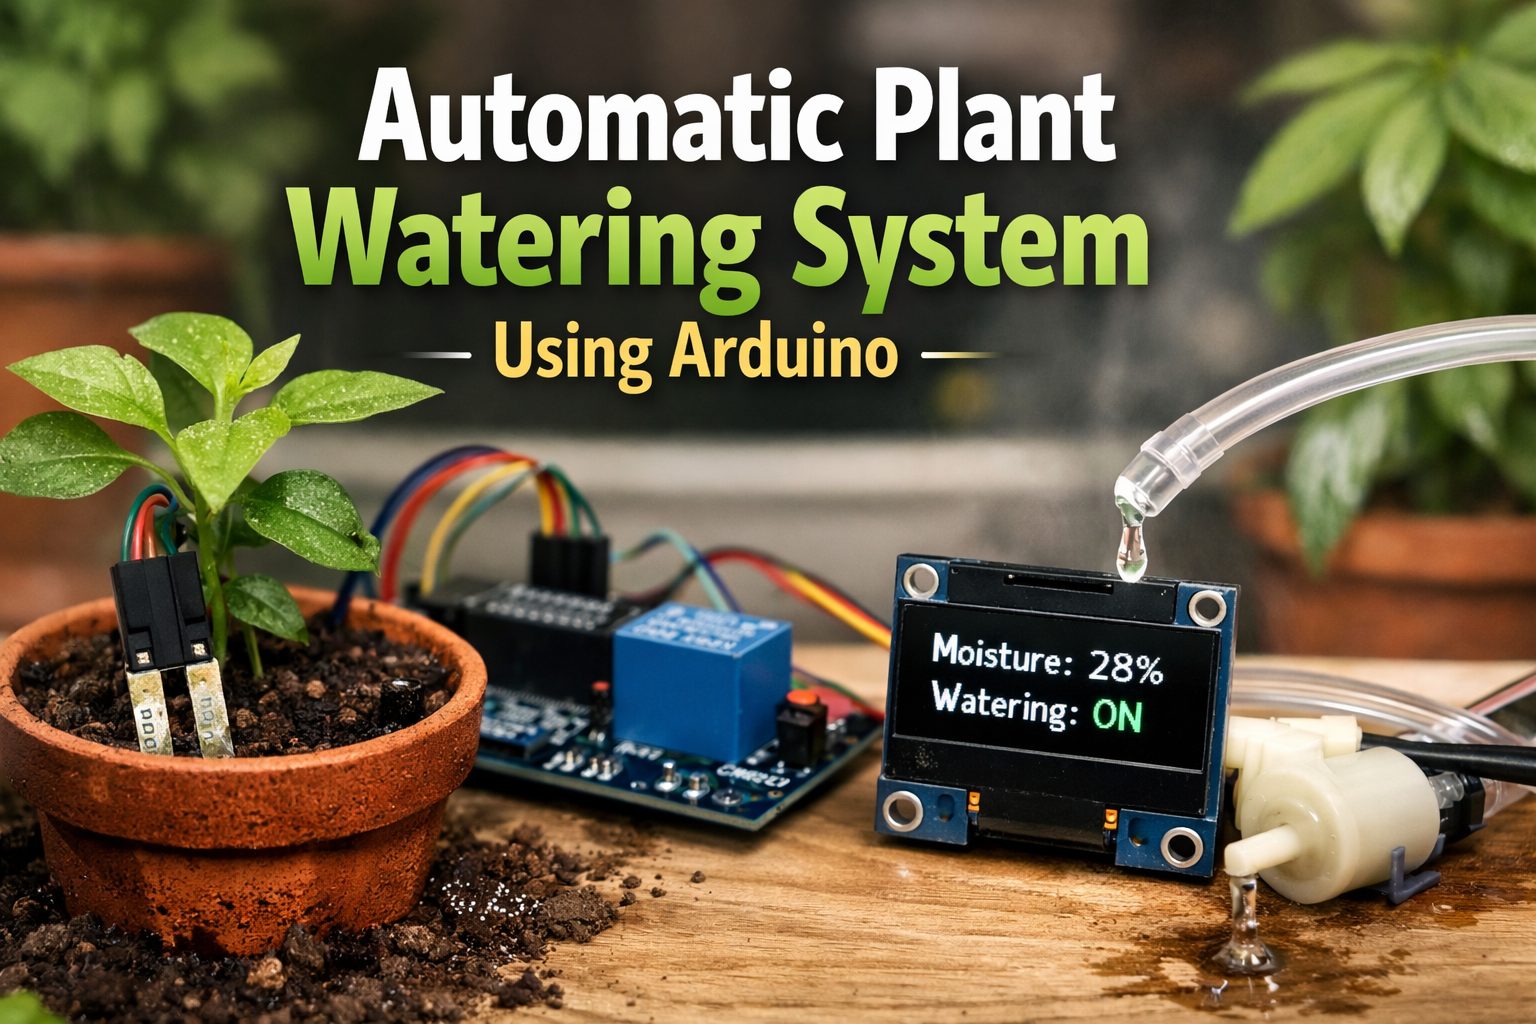
The system reads soil moisture in real time, calculates the moisture percentage, and automatically turns on a water pump when the soil becomes too dry. The OLED display shows live moisture data and watering status.
This project demonstrates practical use of sensor interfacing, analog-to-digital conversion (ADC), relay control, and OLED display communication in an embedded system.
How the Arduino Plant Watering System Works
The core logic is simple:
- If soil moisture > 30% → Pump OFF
- If soil moisture < 30% → Pump ON
The Arduino continuously reads the analog value from the soil moisture sensor, converts it into percentage, and compares it with a predefined threshold.
When watering is activated, the OLED display shows:
Moisture: XX%
Watering: ON
Once sufficient moisture is restored, the pump automatically stops.
Components Used
Arduino UNO
Acts as the central controller for sensor reading and pump control.
Soil Moisture Sensor
Measures soil wetness and sends analog signals to A0.
1-Channel Relay Module
Electrically isolates and safely switches the 3V water pump.
3V DC Water Pump
Delivers water when activated.
0.96” I2C OLED Display
Displays:
- Real-time moisture percentage
- Watering status
Circuit Diagram
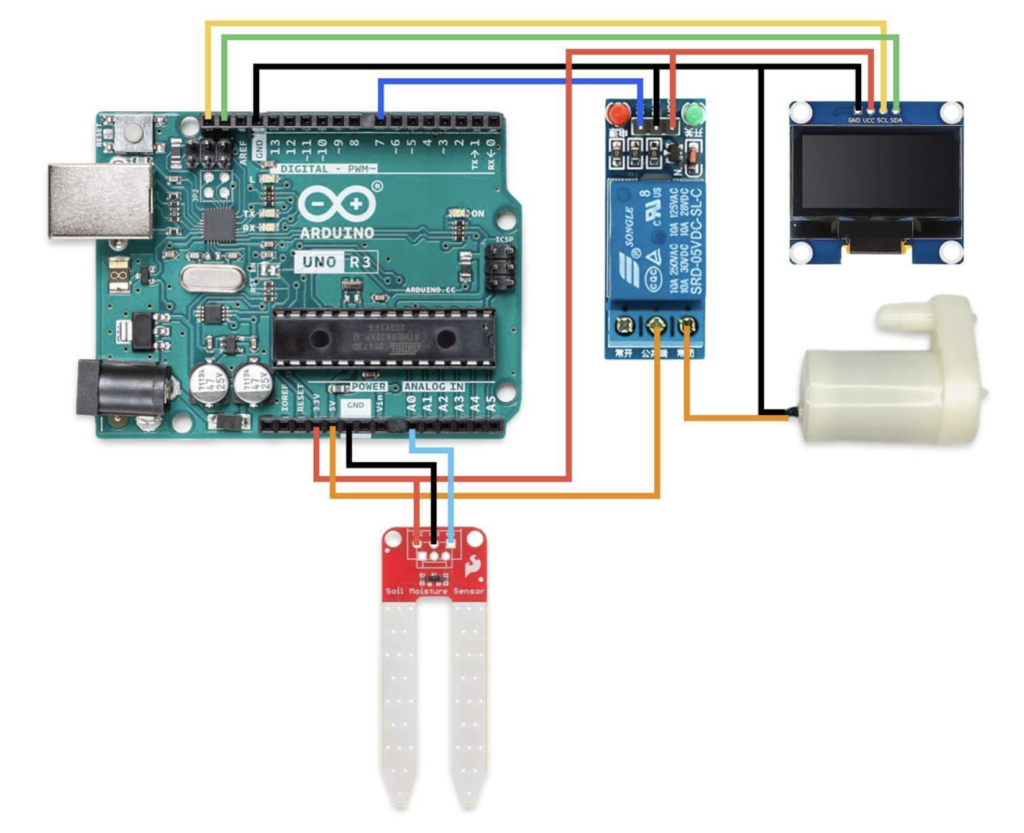
Circuit Connections
Soil Moisture Sensor
- VCC → 3.3V
- GND → GND
- OUT → A0
Relay Module
- IN → D7
- VCC → 3.3V
- GND → GND
Water Pump
- Positive → Relay NO
- Other lead → GND
- Relay COM → 5V
OLED Display (I2C)
- VCC → 3.3V
- GND → GND
- SDA → SDA
- SCL → SCL
Algorithm
- Initialize OLED display
- Read analog soil moisture value
- Convert value to percentage
- Compare with threshold (30%)
- If below threshold → Activate relay
- Display real-time data
- Repeat continuously
Code
#include <Wire.h>
#include <Adafruit_GFX.h>
#include <Adafruit_SSD1306.h>

// ===== OLED CONFIG =====
#define SCREEN_WIDTH 128
#define SCREEN_HEIGHT 64
#define OLED_RESET -1
Adafruit_SSD1306 display(SCREEN_WIDTH, SCREEN_HEIGHT, &Wire, OLED_RESET);

// ===== PIN CONFIG =====
const int sensorPin = A0;
const int relayPin = 7;

// ===== SETTINGS =====
int thresholdPercent = 30;   // Watering threshold
int dryValue = 1023;         // Sensor value in dry air (calibrate!)
int wetValue = 300;          // Sensor value in water (calibrate!)

void setup() {
 Serial.begin(9600);
 pinMode(relayPin, OUTPUT);
 digitalWrite(relayPin, HIGH);  // Relay OFF initially (Active LOW relay)

 // Initialize OLED
 if (!display.begin(SSD1306_SWITCHCAPVCC, 0x3C)) {
   Serial.println("OLED initialization failed");
   while (true);
 }
 display.clearDisplay();
 display.setTextColor(SSD1306_WHITE);
 display.setTextSize(1);
 display.setCursor(0, 0);
 display.println("Automatic Plant");
 display.println("Watering System");
 display.display();
 delay(2000);
}

void loop() {
 int sensorValue = analogRead(sensorPin);

 // Map sensor value to percentage
 int moisturePercent = map(sensorValue, dryValue, wetValue, 0, 100);

 // Constrain values between 0–100
 moisturePercent = constrain(moisturePercent, 0, 100);
 Serial.print("Raw Sensor: ");
 Serial.print(sensorValue);
 Serial.print(" | Moisture: ");
 Serial.print(moisturePercent);
 Serial.println("%");

 // ===== OLED DISPLAY =====
 display.clearDisplay();
 display.setCursor(0, 0);
 display.print("Moisture: ");
 display.print(moisturePercent);
 display.println(" %");
 display.setCursor(0, 25);
 if (moisturePercent < thresholdPercent) {
   digitalWrite(relayPin, LOW);   // Turn pump ON
   display.println("Watering: ON");
 }

 else {
   digitalWrite(relayPin, HIGH);  // Turn pump OFF
   display.println("Watering: OFF");}
 display.display();
 delay(2000);
}
Results
- Above 30% → Pump remains OFF
- Below 30% → Pump activates automatically
- OLED updates moisture percentage every cycle
- System stops watering once soil reaches sufficient moisture
The automation works reliably for small indoor plants and reduces water wastage.
Applications of Arduino Automatic Watering System
- Home indoor plants
- Balcony gardens
- Smart gardening projects
- Agriculture prototypes
- IoT irrigation system foundation
Future Improvements
This system can be upgraded with:
- Wi-Fi control using ESP8266 or ESP32
- Mobile app notifications
- Solar-powered operation
- Water level monitoring
- Weather-based irrigation logic
Conclusion
The automatic plant watering system using Arduino demonstrates how simple microcontroller-based automation can solve everyday problems. By combining sensor input, relay switching, and display feedback, this project creates a reliable and efficient smart irrigation solution.
It is an excellent beginner-to-intermediate level embedded systems project.